Remote LAN access with WireGuard
In this episode, let’s go over how to set up a simple but secure tunnel (read: VPN) to your local LAN (read: homelab) using WireGuard. We’ll be going with the VPS route so we don’t have to expose any ports to the internet.
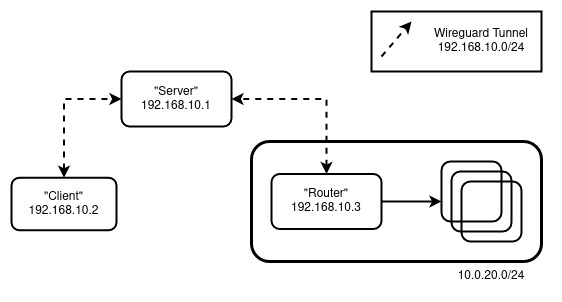
We’ll be emulating the following setup:
The Cast:
- “Router” - The machine that will serve as the gateway (inwards) to your LAN
- “Server” - The machine with a publicly accessible IP that all clients will connect to. Also known as a “Bounce Server”
- “Client” - You, trying to connect to your LAN remotely somewhere
set up
Note: All the machines here are Ubuntu-based. Adjust the setup accordingly to your distro of choice.
For “Server” and “Router” perform the following:
sudo apt update && sudo apt upgrade
sudo apt install wireguard
wg genkey | tee privatekey | wg pubkey > publickey
sudo sysctl net.ipv4.ip_forward=1
Note: To persist IP Forwarding, edit /etc/sysctl.conf with net.ipv4.ip_forward=1
Execute the following command to make the changes take effect: sysctl -p /etc/sysctl.conf
For the “Server”, create /etc/wireguard/wg0.conf with:
[Interface]
Address = 192.168.10.1/32
ListenPort = 51820
PrivateKey = <Server's Private Key>

# Router Peer
[Peer]
PublicKey = <Router's Public Key>
AllowedIPs = 192.168.10.0/24, 10.0.20.0/24
For the “Router”, create /etc/wireguard/wg0.conf with:
[Interface]
Address = 192.168.10.3/32
PrivateKey = <Router's Private Key>
PostUp = iptables -A FORWARD -i wg0 -j ACCEPT; iptables -t nat -A POSTROUTING -o ens18 -j MASQUERADE
PostDown = iptables -D FORWARD -i wg0 -j ACCEPT; iptables -t nat -D POSTROUTING -o ens18 -j MASQUERADE

# if your target network cart("above ens18") si behind the virtual bridge like vmbr0 on pve,replace configurations with below. -s for the wireguard intranet segment.
PostUp = iptables -A FORWARD -i wg0 -j ACCEPT; iptables -A FORWARD -i vmbr0 -j ACCEPT; iptables -t nat -A POSTROUTING -s '192.168.10.0/24' -o vmbr0 -j MASQUERADE
PostDown = iptables -D FORWARD -i wg0 -j ACCEPT; iptables -D FORWARD -i vmbr0 -j ACCEPT; iptables -t nat -D POSTROUTING -s '192.168.10.0/24' -o vmbr0 -j MASQUERADE


# Server
[Peer]
PublicKey = <Server's Public Key>
Endpoint = <Server's Public IP>:51820
AllowedIPs = 192.168.10.0/24
PersistentKeepalive = 25
Note: Replace ens18 with the appropriate interface
Enable the interface by wg-quick up wg0 and then check the status by wg show.
At this point, we can perform a quick sanity check. On my setup, running mtr 10.0.20.1 on the “Server” yields:
                         Packets               Pings
Host                   Loss%   Snt   Last   Avg  Best  Wrst StDev
1. 192.168.10.3        0.0%     2   61.8  41.5  21.1  61.8  28.8
2. 10.0.20.1           0.0%     2   48.3  33.0  17.6  48.3  21.7
“Client”
On the “Client” perform the following:
sudo apt update && sudo apt upgrade
sudo apt install wireguard
wg genkey | tee privatekey | wg pubkey > publickey
Then create /etc/wireguard/wg0.conf with:
[Interface]
Address = 192.168.10.2/32
PrivateKey = <Client's Private Key>

[Peer]
PublicKey = <Server's Public Key>
Endpoint = <Server's Public IP>:51820
AllowedIPs = 10.0.20.0/24
PersistentKeepalive = 25
Enable the interface by wg-quick up wg0 and then check the status by wg show. We also need to update the wg0.conf of “Server” with “Client” as a new peer.
Update “Server” with:
[Interface]
Address = 192.168.10.1/32
ListenPort = 51820
PrivateKey = <Server's Private Key>

# Router LAN
[Peer]
PublicKey = <Router's Public Key>
AllowedIPs = 192.168.10.0/24, 10.0.20.0/24

# Client
[Peer]
PublicKey = <Client's Public Key>
AllowedIPs = 192.168.10.2/32
Note: Don’t forget to restart the wg0 interface by wg-quick down wg0 && wg-quick up wg0.
Now, running mtr 10.0.20.1 on the “Client” yields:
                         Packets               Pings
Host                   Loss%   Snt   Last   Avg  Best  Wrst StDev
1. 192.168.10.1        0.0%     6   41.2  42.1  21.4  73.6  18.7
2. 192.168.10.3        0.0%     5   64.8  72.0  41.8  88.1  19.3
3. 10.0.20.1           0.0%     5   77.4  62.3  43.0  77.4  13.3
Which follows the “Client” -> “Server” -> “Router” flow that we want.
Note:Use wireguard with systemd:
systemctl enable wg-quick@wg0
systemctl daemon-reload
systemctl start systemd-networkd
systemctl start wg-quick@wg0